

Tuesday, April 30, 2013
Inspiration Station
Mel and Louise (my daughter and her friend) are starting a craft school in Doha, Qatar. Don't you just wish you were there! It sounds great.


Sunday, April 28, 2013
Charity Challenge quilt
I said I wasn't going to start any new projects but I've done it again - deadlines dictated that a new project had to be done!
The Counties Manukau guild show is on in a couple of weeks and our challenge was to do a quilt representing a charity. The quilts are then going to be given to the respective charities. I chose to do one for the hospice but didn't even start by hand-in day. Unfortunately there weren't many challenge quilts so I decided to do my idea anyway. I reasoned to myself that it wouldn't take long. Ever the optimist!

Here's where I've got to so far. It's the stylised kowhai flowers from the hospice logo. I only have one more row of green/blue strips to sew on and then quilting and binding. To keep it simple, I'm going to quilt feathers all over it rather than do separate things on the flowers, sashing, borders and background. I don't think that will detract from the design. What do you think?
I've also made a small confetti quilt but I think it needs more.
The Counties Manukau guild show is on in a couple of weeks and our challenge was to do a quilt representing a charity. The quilts are then going to be given to the respective charities. I chose to do one for the hospice but didn't even start by hand-in day. Unfortunately there weren't many challenge quilts so I decided to do my idea anyway. I reasoned to myself that it wouldn't take long. Ever the optimist!

Here's where I've got to so far. It's the stylised kowhai flowers from the hospice logo. I only have one more row of green/blue strips to sew on and then quilting and binding. To keep it simple, I'm going to quilt feathers all over it rather than do separate things on the flowers, sashing, borders and background. I don't think that will detract from the design. What do you think?
I've also made a small confetti quilt but I think it needs more.

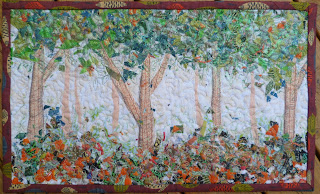
That tree in the centre is too chunky so I need to cover it up. I like the canopy of leaves but the undergrowth hasn't really worked. I tried to get a feeling of depth by putting lighter fabrics at the top and paler tree trunks for trees that are further away. I don't think that worked. I'm going to add more foreground and possibly put a deer over the fat tree.
Are you a Google Reader user? If so, have you decided what to use when it goes? One blogger I follow recommended bloglovin but I've been subjected to porn in my feed twice now so I wouldn't recommend that! The first time I told them about it. The second time was time to get rid of it! I tried Feedly but the app for iPad has a few bugs. Any other recommendations?
Sunday, April 14, 2013
Modern Cot Quilt - finished
I've managed one finish, the cot quilt we started with Robyn in our Modern Quilting class several months ago. Why has it taken me so long? Well, I still don't have any grandchildren!! So there you go girls, the first one to produce a grandchild gets this quilt. Granny Pat (aka my Mum) says that the nursery has to be decorated to match!

I used the left-over fabric on the back as well as two blocks that didn't make it into the front. Quilt making should be about being thrifty! Talking about thrifty, I bought the patterned fabric last year for $5 at Fabric-a-brac, a fund-raising event run by the Mercy Hospice. If you ever need to destash, get a stall at this event. On the other hand, if you want some real bargains you'll have to wait until next year.
 The machine quilting on this quilt was very simple and very quick, just diagonal lines through the patterned blocks. Then cross blocks are hand-quilted with 2 strands of embroidery floss matching the colour of the cross and done using nice big stitches. I really like the look.


Saturday, April 6, 2013
Craftsy class, Lola Jenkins' Thread Art
I've actually finished a quilt! Ok, it's only small and no piecing but it's finished.
I bought a couple of Craftsy classes just before Christmas and I've been looking forward to doing Lola's project. Then I had a need to make a "Don't touch the quilts" small quilt for our show next month. Putting the two together made sense.
Here's my quilt, about A4 size.

I was originally thinking of using the first photo below of my daughter for this technique but I was going to remove the Christmas hat. Then she sent me the second photo and the idea for an "eyes only" quilt was born.


I cropped the photo and printed it black and white. Then I went over the main lines of contrast with a Sharpie.

I transferred the lines on to fabric with the same Sharpie but used a fine pen for the eyes.


I think I used five colours on the iris of the eye! Most of that is coloured pencils but I used Derwent Inktense for the shading on the face. As you can see I follow the less-is-more school when it comes to painting. The rose print on the fabric was already doing a lot for me but I found that by adding just a hint of brown to suggest the eye socket (following on from the eyebrow) was enough to stop it looking flat.
I finished off with a satin stitch edge, using the same colours that I quilted the hair with - not because I'm lazy and couldn't be bothered getting a different thread - well, mostly because I'm lazy but I liked it anyway! So there!

I bought a couple of Craftsy classes just before Christmas and I've been looking forward to doing Lola's project. Then I had a need to make a "Don't touch the quilts" small quilt for our show next month. Putting the two together made sense.
Here's my quilt, about A4 size.

I was originally thinking of using the first photo below of my daughter for this technique but I was going to remove the Christmas hat. Then she sent me the second photo and the idea for an "eyes only" quilt was born.


I cropped the photo and printed it black and white. Then I went over the main lines of contrast with a Sharpie.

I transferred the lines on to fabric with the same Sharpie but used a fine pen for the eyes.

All the hatching is done with black thread. I also quilted Bec's hair with a variegated thread and tight spirals.

I think I used five colours on the iris of the eye! Most of that is coloured pencils but I used Derwent Inktense for the shading on the face. As you can see I follow the less-is-more school when it comes to painting. The rose print on the fabric was already doing a lot for me but I found that by adding just a hint of brown to suggest the eye socket (following on from the eyebrow) was enough to stop it looking flat.
I finished off with a satin stitch edge, using the same colours that I quilted the hair with - not because I'm lazy and couldn't be bothered getting a different thread - well, mostly because I'm lazy but I liked it anyway! So there!

Usually I would do the satin stitch edge with a stabiliser on the back but even with tear-away and a close stitch, you sometimes get little bits of paper poking out. I decided to do an experiment. Sharon Schamber stabilises the edge of her quilts with glue and then glues on the binding. I thought that was a great idea so I glued all the edge with 'No more pins' and got all the pokey threads stuck down. I'm pleased with the satin stitch and there are no pokeys!
All in all, a fun project and one I will try again. More finishes to do for the show before I can start anything new though. Hopefully I'll be posting again soon with my next finish!
Sunday, March 24, 2013
Bits and bobs
Work has been getting in the way of my creativity. However, some of my work has been creative so that's not so bad. I've been a bit busy with my ESOL ladies.

Then we made needlecases. I made mine using inklingo. It's a pdf file with the pattern pieces that you print on to the back of the fabric. My printer is a pain in the proverbial so I didn't print them for my 16 ladies. That would have been a mission. It was a good exercise in accurate cutting and making sure that you used a quarter inch seam allowance. Out next project is the Winding Ways pattern.
 I used a piece of discharge dyed black fabric on the inside. I think I should have washed the fabric first. It didn't discharge very much.

Last weekend I made a scarf with Cindy. She was complaining that I hadn't updated my blog in a while so here you go Cindy but nothing new for you I'm afraid!


We made pincushions with button bases and elastic to either go on our fingers or wrists.
Then we made needlecases. I made mine using inklingo. It's a pdf file with the pattern pieces that you print on to the back of the fabric. My printer is a pain in the proverbial so I didn't print them for my 16 ladies. That would have been a mission. It was a good exercise in accurate cutting and making sure that you used a quarter inch seam allowance. Out next project is the Winding Ways pattern.
Last weekend I made a scarf with Cindy. She was complaining that I hadn't updated my blog in a while so here you go Cindy but nothing new for you I'm afraid!
I love it! It's alpaca wool on top of fine black silk chiffon. The purple blobs are merino and the coloured bits are silk roving. Then I also meandered a fancy yarn through the whole thing but since it was synthetic, it hasn't felted in very well. I'm going to sew it down with a fine silk thread in grey. I hoping the stitches won't show.
As you can see in this photo, it's very fine. I'm going to have to buy some purple clothes to go with it!
I've also quilted the background of the clown quilt but I'll put a photo of that up with I've done it all. Now I need to concentrate on finishing some things for our show. Hand in day is next month.
If you are in Auckland, come along to the show, 11th and 12th May at the Papatoetoe town hall.
Saturday, February 9, 2013
Mystery quilt revealed
I've really wanted to post this but I had to wait until our first guild meeting so that the ladies who made it could see it first (apart from a select few who saw it in person :D).
As promised, I will share how we did this.
 |
| Clown - border still to be added, 36" by 48" so far |
As promised, I will share how we did this.
Firstly, I found an image on www.canstockphoto.com that I thought was simple enough and that filled a rectangle nicely. It cost me about $2.50 and I don't begrudge paying such a small amount. We should be supporting artists - one day it may be my daughter that you are paying!
Print out on A4 size paper and draw a grid on the image of 4cm squares. That's it on the right of the photo below.
 That gives you 6 squares across and 8 squares down. A4 is slightly smaller than that so the outside squares will have more background than shows on your A4 print. Try to position the grid so that the lines cut through the drawing at convenient places. I'll show what I mean in the next diagram.
Freezer paper is 18" wide so you can get three 6" squares across the paper. Tape two sheets together and draw a 6" grid on the freezer paper, 6 squares by 8 squares.
Do we all remember making enlargements in Art at school? Look at the intersections of the drawing with the grid on the A4 print and transfer those marks to the freezer paper grid. Connect the dots - with flair and panache! (see below for hints on flair and whatever!!)
Number the squares on the A4 print and freezer paper pattern.
Cut up both A4 and freezer paper into the squares and attach the 4cm colour square to the 6" pattern square with a paper clip, ready for the needleturn applique.
I made a video for the needleturn applique but it never uploaded to YouTube and I forgot that when I handed in my iPad to school for wiping! I will try to remake it and cover that in another post. In the meantime, I will try to explain how I drew this.
Draw in pencil to start with. Although you are going to try to enlarge the drawing to look like the original, this is an opportunity to change it a bit so that it is easy to put back together again. You may have to adjust the position of the 4cm grid on the A4 sheet depending on how it falls. I found that if I started with a line touching the bottom of the mouth, the nose was divided into reasonable sized sections. If you find that a lot of slivers of colour end up just going over a line, can you shift the grid to get more of a shape falling in a square? You're not going to manage to get it fitting 100%. This is where the flair comes in.
 Looking at the pattern of the hat on the left, you can see that I made the hatband follow the line of a square on the left side. I really didn't want to have to sew a tiny blue bit and it looks fine as it is. I've also made some of the curls of the hair go into a line as well. I must have drawn the flower about 10 times and I still wasn't happy with it but it ended up looking ok. You can see my many pencil lines!
After adjusting lines, I stuck the pattern on the wall with masking tape and stood back to see if any of the adjustments looked a bit too kooky. More rubbing out and more pencil lines!
Once I was happy with it, I went over the lines with a permanent pen with a 0.25mm nib and then rubbed out all the pencil lines.
This has been a really fun project and I'm very pleased with the results, as were the women that worked on it at guild. Some didn't even realise that this was the project they had worked on! I really fooled them - in a good way. I hope you consider doing this with your group. Send me photos if you do!
This quilt will be displayed at our guild exhibition in May and we will be making a matching quilt at the show. If you are in the Papatoetoe area in Auckland on the 11th and 12th of May, call in and make a square. The quilts will go to children in care. Two lucky siblings should get these ones.
Freezer paper is 18" wide so you can get three 6" squares across the paper. Tape two sheets together and draw a 6" grid on the freezer paper, 6 squares by 8 squares.
Do we all remember making enlargements in Art at school? Look at the intersections of the drawing with the grid on the A4 print and transfer those marks to the freezer paper grid. Connect the dots - with flair and panache! (see below for hints on flair and whatever!!)
Number the squares on the A4 print and freezer paper pattern.
Cut up both A4 and freezer paper into the squares and attach the 4cm colour square to the 6" pattern square with a paper clip, ready for the needleturn applique.
I made a video for the needleturn applique but it never uploaded to YouTube and I forgot that when I handed in my iPad to school for wiping! I will try to remake it and cover that in another post. In the meantime, I will try to explain how I drew this.
Draw in pencil to start with. Although you are going to try to enlarge the drawing to look like the original, this is an opportunity to change it a bit so that it is easy to put back together again. You may have to adjust the position of the 4cm grid on the A4 sheet depending on how it falls. I found that if I started with a line touching the bottom of the mouth, the nose was divided into reasonable sized sections. If you find that a lot of slivers of colour end up just going over a line, can you shift the grid to get more of a shape falling in a square? You're not going to manage to get it fitting 100%. This is where the flair comes in.
After adjusting lines, I stuck the pattern on the wall with masking tape and stood back to see if any of the adjustments looked a bit too kooky. More rubbing out and more pencil lines!
Once I was happy with it, I went over the lines with a permanent pen with a 0.25mm nib and then rubbed out all the pencil lines.
This has been a really fun project and I'm very pleased with the results, as were the women that worked on it at guild. Some didn't even realise that this was the project they had worked on! I really fooled them - in a good way. I hope you consider doing this with your group. Send me photos if you do!
This quilt will be displayed at our guild exhibition in May and we will be making a matching quilt at the show. If you are in the Papatoetoe area in Auckland on the 11th and 12th of May, call in and make a square. The quilts will go to children in care. Two lucky siblings should get these ones.
Monday, January 28, 2013
Bento lunches
School starts tomorrow and I'm planning my lunches. I'm not going to be teaching in one class room this year so my usual lunch of left-overs may be difficult. One of my classes is at the opposite end of the school from the staffroom and I don't want to be spending all my time walking about so cold lunches I can eat in the resource room or class room would be better. Yes, the exercise is good for me but the stress isn't! Stress = eat on the run = muffins! So I'm planning some nice healthy bento lunches.
Here's my current lunchbox scenario.

I've hot-glued the strap assembly to the bag and I think you'll agree, it not only looks better but is more functional.
Here's my current lunchbox scenario.
My lunchbox is the right size and has a divider. Did you know that your bento box has to be the right size for your sex and age? More info on that on Just Bento. I bought a new ice pack as my old one was an questionable number of years old. But I can't find a better cold bag that this one. It's the right size, made by the same people as the box, but it has problems. It only fits the box and ice pack but I'm not going to pack any extras so that's not a problem. The main problem is that it stands up. The box should be leakproof but if I'm made my lunch horizontal, that's the way I want my lunch to stay. Also it doesn't have a carry strap for when your hands are loaded with books etc. And, the biggest problem, it doesn't look CUTE! Sorry about the caps shouting but I want my lunch to look nice!
So I made a strap.
 |
| This part velcros so I can still get into the zip pocket. Designed to be carried over my wrist. |
 |
| I've also added a long strap so that I can carry it over my shoulder. |
It was also an opportunity to improve my binding sewing skills. I watched a video of Sharon Schamber's on binding (from Monika's blog? Can't remember!) and picked up some great tips. I will now use ladder stitch and not the slower applique stitch that I've been using up to now. Maybe all tutors teach ladder stitch nowadays but I've come from a dressmaking background and I'm basically self-taught over the past 30 years. I can't believe I've been doing this for 30+ years! And there is still more to do and learn!
I picked up this great tip on another bento blog. Take any minced meat (either as it comes from the butcher or add breadcrumbs, seasoning and egg for patties as I did here), put it in a large ziplock bag, squash it flat and then score into portions. When it is frozen, the portions snap apart. Clever!

This recipe is 450g chicken mince, 450g pork mince, one egg, about 2 cups of wholemeal breadcrumbs, small bunch of chopped parsley, 2 tbsp Thai seasoning from the tubes that you find in the veg section at the supermarket, 1 tsp veg stock powder, salt, pepper. I used my quilting ruler to measure the squashed bag, divided it by 3 and then pressed down with the edge of the ruler to score it. I think the middle portion is slightly fatter than the others so maybe next time I take that into consideration and make the middle section slightly less than a third.
All set for my first day back at school!
All set for my first day back at school!
Subscribe to:
Posts (Atom)