Showing posts with label mixed media backgrounds. Show all posts

Tuesday, December 17, 2019

Summer is coming... but not today

We've had some wonderful weather already but today is overcast and windy. A bit miserable. But here is another art journal page I've completed.


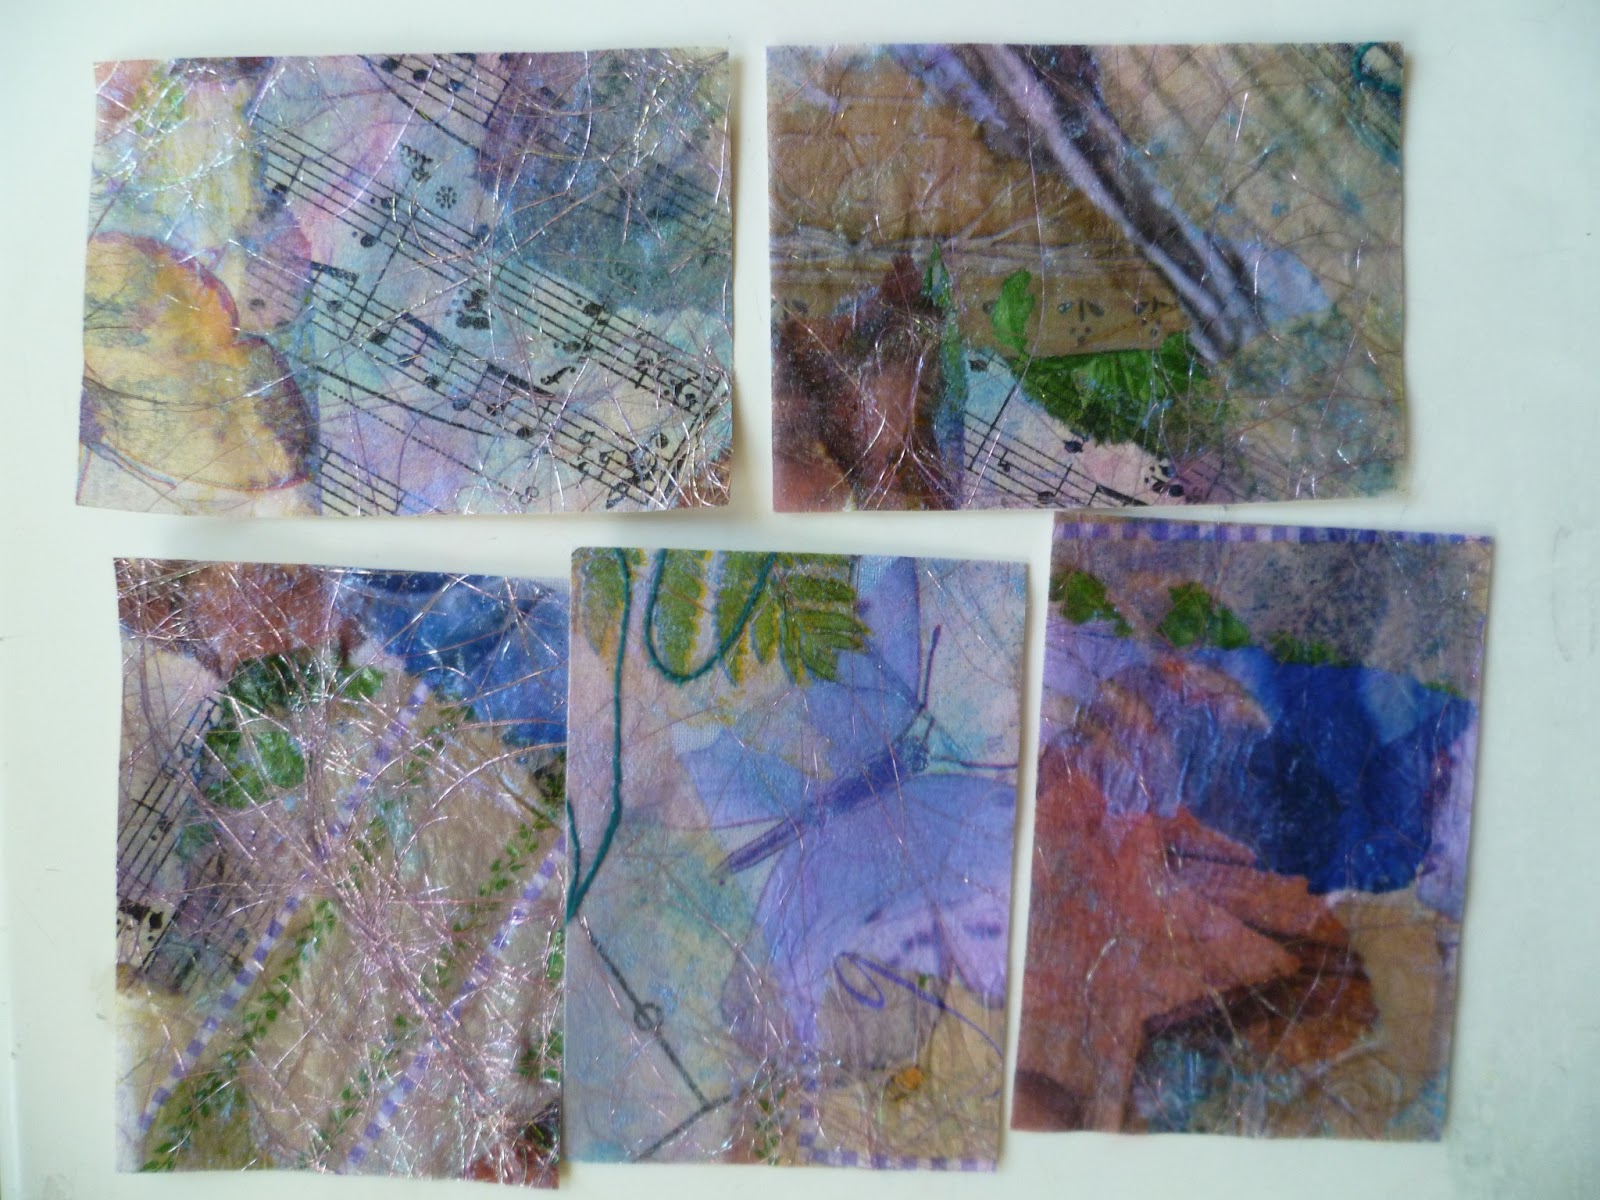
This is decoupaged napkins again and the dragonfly is a rub-on transfer. I'm doing this in my pregnancy book. No, I'm not about to have a baby at 60! I have repurposed a second-hand book from the SPCA shop. It's a really weird book on pregnancy with old wives tales, recipes, strange bits of prose and the most unusual 50s style drawings. Think of it like Buzzfeed. It's just a whole load of different things flung together. On this page I decided to leave a bit of a drawing exposed. The top of the page is the original book page.


I've been playing around making some texture plates for my gel plate. These are cardboard letters that I bought somewhere, probably Warehouse Stationery, and then mounted on to foam core board. I love the look of text in mixed media art works but I'm too cheap to buy stencils. I figured that this would work on the gel plate since they are the right way round which when stamped into the gel plate and then lifted in a print will end up the right way round again. I picked out "happy birthday" first, reckoning on that being useful. Then I filled a board the same size as my gel plate with random letters, numbers and punctuation. Looking at the letters I had left, I could make "bacon", "cove, "zone" and many more but I thought "sun" would be more useful. Here's a fun game; add any other words you can see in the comments, just from the ones that are not on the happy birthday or the big mat.

Well, "sun" ended up being useful on the page above. Of course, if I had stamped it, it would have ended up the wrong way round. I had to ink up half my gel plate, press the stamp into the paint and then stamp it on the other half of the gel plate. Then I printed it on to the white layer of napkin I had pulled off the flower napkins. I cut as close to the letters as I could and then glued it in the book. The white of the napkin disappears when it dries.  I have small letter stamps which I found in the bargain bin at Spotlight. I used them to print "here it comes" in purple ink but I forgot to let it dry and I ended up with most of it on my hand. I went over it with a fine Sharpie instead. I've gone around the words with a glitter gel pen and added lines to the "sun" words. It doesn't show in the photo but nice in real life. I hope you enjoy my page and ramblings. I'll make a video next time - maybe!


Friday, December 13, 2019

Beauty is in the eye of the beholder

An art journal page using the weta threadpainting I did many years ago.


I trimmed the fabric around the weta leaving about 2cm all around. Then I decoupaged napkins, painted, stencilled and sprayed until I felt that it was all looking like one piece. The saying was added with Posca pens and highlighted with gold and silver pens.

There was a light bit at the bottom which looked out of place. The napkin had an image of brown ornaments with string. The light bit was a bit of string and that gave me the idea to add some jute. I think it improved the composition of the page as well so a lucky accident.

Monday, October 14, 2019

A little book made from index cards

I've been following Robyn McClendon on YouTube and was inspired to make this little book using index cards and my gel plate. I have also collaged bits of napkins and washi tape to some pages.


Thursday, October 10, 2019

100 days project 2019


I finished my 100 day project about a week late (due on the 8th August) and then I made the book for it about a week later. I've been busy producing other goodies since then and never cleared my desk for long enough to make the video of the last section! Here it is - finally.

Monday, June 17, 2019

100 Days project 2019

I started the 100 days project for 2019 on the 1st May. So far I've completed 46 pages and it's day 48. Not bad going!

My project is to make a paper doodle or collage (most are more of a doodle) using gel print paper. I'm loving my gel plate! I have lots of A4 sheets just done on copier paper as I was trying out things and learning how to print on the gel plate. I have used prints for the background and also for the doodles. My only tools are a pair of scissors, some gum glue (doesn't dry as fast as others) and a bamboo skewer. No pens, extra paint or any other embellishment.

Here is the first 40 days. Please turn the sound down so you can't hear my washing machine!


Monday, December 24, 2018

Little house quilts turned into a book

Time for my annual blog post!  (Updated Sept 2021 with more instructions at the end)

Summer holidays are here and I've finally got around to doing something with my 100 day project quilts. I made 16 of them... in 2016! 


I had a lot of fun making this book. The cover is my usual rubbing, stamping and stencilling on white fabric until I've built up a good texture.


There are lots of videos out in YouTubeland on how to make a book. I've made this one with a cardboard box that was the right depth to make the spine (Mini Magnum box) and used a pamphlet stitch. Just search for pamphlet stitch if you fancy making one like this. Enjoy!


Update: I found my purple ink and script stamp. It just needed a little bit more. Spot the difference!


Updated with more instructions in 2021. This would have been easier as a video or with photos but I didn't take any of the process. I hope my wordy instructions make sense.
  • First, I sewed the 16 mini quilts into back-to-back pairs to make 8 pages. Then I sewed each pair of pages to a grosgrain ribbon spine to make 4 signatures. I used ribbon so that it reduced the bulk at the spine and allowed the pages to fold easily along the spine.
  • I stacked all the pages and measured them for the depth of the spine, making sure to not compress the pages. I found a food box that was an appropriate depth. Turned out to be an ice cream lolly box. Yum! Cut the box a bit bigger than the pages to give a front and back cover and spine all in one big rectangle.
  • The next stage I made overly complicated by sewing on the "Home" letters and also using double sided sticky sheet. A thin coat of mod podge or tacky glue would work just fine. Cut the fabric slightly bigger than the cardboard and glue down. Fold the book closed to make sure that the fabric can stretch over the folds at the spine. Fold the fabric around the edges and glue to the inside of the cover, trimming if necessary. Don't cut the corners off completely. The fabric will just fray and make the corners messy. Cut a few mm from the edge of the cardboard.
Attaching the pages to the cover
  • From cardstock or patterned paper, cut two endpapers very slightly smaller than the inside covers. This will cover up fabric from the outside of the cover. Cut another piece the height of the endpaper and the width of the spine plus about 6cm/2 inches. 
  • Cut a piece of cardboard the same height as the endpaper and very slightly smaller than the width of the spine. This has to fit inside the spine when the book is closed.
  • Now for some maths. Measure the width of the extra cardboard spine that you cut. Divide this measurement by the number of signatures that you have. This is going to be the spacing between your signatures.
  • Mark the position of the holes in the cardboard spine to attach the signatures. Mark the first line are half the spacing distance from the long edge. The rest of the lines will be spaced out at the distance you calculated so that the final line is half a spacing from the other edge. Round as nessary for easy measuring and the make sure that the signatures are centered. For example, my spine was 47mm. I had 4 signatures so my spacing was 11mm and a bit. I rounded it down to 10mm for the full spacing and rounded up to 8mm for the half spacing. So I had lines at 8mm, 18mm, 28mm and 38mm, which meant I had 9mm space at the back.
  • Now to find the position of the holes for stitching in the signatures. Draw a line across the vertical lines half way down the length of the spine. Draw another two lines across at equal distance for the top and bottom holes so that the holes will be inside the page size (not the cover size).
  • Glue the spine patterned paper the the other side of the cardboard spine, centering the cardboard on the paper.
  • Punch holes in the cardboard at the positions you marked. I have a very small hole punch but an awl or anything sharp can used to make the holes.
  • Sew in each signatures using a pamphlet stitch. As I said at the top, there are plenty of videos showing this and it is hard to explain without photos or diagrams.
  • Using a strong glue, tacky glue or silicon, glue the cardboard spine in place and glue the extra flaps of paper to the front and back covers.
  • Glue the front and back endpapers to front and back covers respectively.  These will go over the extra paper from the spine to help secure it.
I have to say that this isn't a traditional bookbinding method. Endpapers are meant to be a double page and glued to the text block (the book pages) and the inside cover. I've adapted it because obviously I didn't want to glue paper to fabric. My book is still looking good three years on. The cardboard spine didn't glue down properly but the endpapers have kept it all in place.

Tuesday, January 7, 2014

Tablecloth finally finished!

As I write this, my tablecloth is in the washing machine so technically, it isn't finished yet. This is an anxious time. Now I'm going to find out how colourfast my crayons are!
This is before the wash.
And after the wash. I swear that's a different photo. I'm really pleased with the results. So the trick is leave your crayons to cure for a year!

Well, I wrote that above about 6 months ago. Since then I've put on the binding but never finished it because my table hasn't been clear of Becky's stuff! But look at this lovely neat and tidy corner now, complete with finished tablecloth! Just as well my photos aren't 360 degrees because some of the "stuff" is behind me. (Becky, I'm down to one box and the the tray - yay!) 


 I used the same binding technique I did on the clown. You can see how to do it here. I like the little bit of blue batik showing on this binding.
And here is how it looks on the back. The stitch-in-the-ditch on the binding just shows as a straight line about quarter of an inch from the binding, depending on the width of the binding and how good your quarter inch seam is when you sew the binding on. This is my best corner that I'm showing you. In other parts my quarter inch seam was not so good! Still, it's quick and I think gives a good finish.

My original post about this quilt is here. I'm embarrassed to see that that post was 18 months ago! Maybe this is the year that I actually finish things!

Saturday, July 27, 2013

ATCs from fabric paper/paper fabric

Oh, what fun I've had with the arty farty group. We made fabric paper - or is it paper fabric? Then we turned them into artist trading cards.

The beginnings of my edition called 'Spring'. There will be 12 in this edition.

I made this by separating the 3-ply layers of pretty serviettes and glueing the top layer to fabric. I also added bits of text torn out of an old book, music or bits of old patterns or tissue. Then I painted it all with a thin wash of purple, added some Angelina fibres, couched some perle cotton, a bit of stencilling with sequin waste and added some washi tape.

I've got lots of them!

The next stage is to stitch it to felt and stiffener and then add the embellishments. My embellishment box has grown! I said I wasn't going to get into scrapbooking as my craft hoarding was enough of a problem already. These ATCs have let all that scrapbooking stuff sneak in by the back door! But it's fun and aren't those resin flowers cute?

Monday, July 1, 2013

UFO day at guild

There were five Saturdays in June so we had an extra guild day, our UFO day, but some of us played instead. I took in all my crayons, pens and fabric paint and we did rubbings, stencils and stamps. Look at the wonderful work we all produced!


Shona made her own stencil using freezer paper. We had some stencils I had made, some commercial Christmas and bug stencils and Helen brought in stencils she had bought from Lisa Walton. They are lovely, such delicate detail!

Suzanne, do you recognise your stamps?

Some us made a second piece with a wash of fabric paint over the wax crayon. I didn't get a photo of them but they looked great too. Their challenge is to chop up their fabrics and piece them into something. My challenge is to finish the tablecloth that I started almost a year ago!

Thursday, January 17, 2013

Timmy Dog

I really want a dog so I made one!

This pattern was designed by Abby Glassenberg. It's incredibly clever! I learned a lot about sewing accuracy, clipping and stuffing (I would do it better next time) but even given my slapdash approach, it turned out great. The darts in the underbody and shape in the pieces made even my sewing look good.


This is where the opening in the underbelly was, between the arrows. I started sewing the ladder stitch at the right hand side without reading glasses, found my glasses when I got to the join in the brown fabric and finished it with much better stitching! I should have unpicked the first bit but I didn't realise I could get it so good until I had done about half of the rest.
I enlarged the pattern from A4 to A3, so doubled. This shot gives you an idea of the size. You can also see that I've stencilled 'dog' on his head. I have used fabric paint, Derwent Inktense blocks, Fabrico pens, rubbing with crayons on net, onion bags and other stuff my flowers were wrapped in as well as stencilling with crayons. Then I've added scraps of wool tweeds and organza. It's a lot of fun to make.


Timmy Dog is curious.
Windswept model shot!

I also bought a bird made by Abby. Here's what happened when they met...
Hello! I'm Timmy Dog. What's your name?
I'm Little Birdie. I was made by your designer, Abby Glassenberg.
Nice to meet you Little Birdie. Will you be my friend?
OK.
Timmy Dog and Little Birdie in their house (aka The Bookcase).


Sunday, July 29, 2012

Modern quilting

This project ticks lots of boxes.

  • We did some stenciling and rubbing with crayons and paint sticks in my art quilt group. Homework is to do something with them.
  • I wanted to join in Leah Day's quilt along. (I may be too late but the intention was there!)
  • I wanted to explore some ideas on modern quilts for a class at the guild.
  • I bought a glass table for my new house and needed an everyday table cover. Putting things straight on to glass makes me nervous!
This was just an experiment with Shiva sticks, masking tape and rubbing plates but I liked it so much that I decided to make it the middle of my tablecloth.

Embracing the modern quilt movement - lots of white

I save net from flowers. It's fantastic for adding texture to your surface design.
I also used some net to make stencils. I cut out maple leaf shapes on some fusible web, left the paper backing on it and ironed it to the net. Stenciling through the net gave a lovely watery effect to the stencil.

A watery maple leaf 


All the left over bits were cut into wedge shapes and made into a great border.
So now I need to think about how to quilt it. Am I going to go for Leah's sampler style quilt or maybe feathers? An all over design or highlight the squares? White thread or contrast? So many decisions!!