Showing posts with label collage. Show all posts

Tuesday, December 17, 2019

Summer is coming... but not today

We've had some wonderful weather already but today is overcast and windy. A bit miserable. But here is another art journal page I've completed.


This is decoupaged napkins again and the dragonfly is a rub-on transfer. I'm doing this in my pregnancy book. No, I'm not about to have a baby at 60! I have repurposed a second-hand book from the SPCA shop. It's a really weird book on pregnancy with old wives tales, recipes, strange bits of prose and the most unusual 50s style drawings. Think of it like Buzzfeed. It's just a whole load of different things flung together. On this page I decided to leave a bit of a drawing exposed. The top of the page is the original book page.


I've been playing around making some texture plates for my gel plate. These are cardboard letters that I bought somewhere, probably Warehouse Stationery, and then mounted on to foam core board. I love the look of text in mixed media art works but I'm too cheap to buy stencils. I figured that this would work on the gel plate since they are the right way round which when stamped into the gel plate and then lifted in a print will end up the right way round again. I picked out "happy birthday" first, reckoning on that being useful. Then I filled a board the same size as my gel plate with random letters, numbers and punctuation. Looking at the letters I had left, I could make "bacon", "cove, "zone" and many more but I thought "sun" would be more useful. Here's a fun game; add any other words you can see in the comments, just from the ones that are not on the happy birthday or the big mat.

Well, "sun" ended up being useful on the page above. Of course, if I had stamped it, it would have ended up the wrong way round. I had to ink up half my gel plate, press the stamp into the paint and then stamp it on the other half of the gel plate. Then I printed it on to the white layer of napkin I had pulled off the flower napkins. I cut as close to the letters as I could and then glued it in the book. The white of the napkin disappears when it dries.  I have small letter stamps which I found in the bargain bin at Spotlight. I used them to print "here it comes" in purple ink but I forgot to let it dry and I ended up with most of it on my hand. I went over it with a fine Sharpie instead. I've gone around the words with a glitter gel pen and added lines to the "sun" words. It doesn't show in the photo but nice in real life. I hope you enjoy my page and ramblings. I'll make a video next time - maybe!


Friday, December 13, 2019

Beauty is in the eye of the beholder

An art journal page using the weta threadpainting I did many years ago.


I trimmed the fabric around the weta leaving about 2cm all around. Then I decoupaged napkins, painted, stencilled and sprayed until I felt that it was all looking like one piece. The saying was added with Posca pens and highlighted with gold and silver pens.

There was a light bit at the bottom which looked out of place. The napkin had an image of brown ornaments with string. The light bit was a bit of string and that gave me the idea to add some jute. I think it improved the composition of the page as well so a lucky accident.

Saturday, January 7, 2012

Third bag finished

This is the third bag I've made using this collage fabric. And yet again, this one is off overseas. My sister left for the Caribbean yesterday and she was very pleased with her bag. I was happy to make it for her. I'm happy to make anything that someone appreciates!

The strap is four layers of denim with one layer of heavy interfacing so attaching it to the bag was a little tricky. I cut away two layers of denim and the interfacing and did this mock overlocking stitch. It's a line of zigzag with a line of stitching top and bottom. My machine motor couldn't cope with some of the thickness where the stitches caught any extra layers of denim. I had to hand crank the machine for most of this!


The back pocket was made to take her iPad.

Front pockets or side pockets take her Blackberry.

And I didn't forget about old-fashioned technology. Pockets for pens inside.

I just adore these feet. They make a lovely finish.

Tuesday, January 3, 2012

Collage technique

I made my sister make her own bag! Well, I made her design her own collage anyway. It's easy and there is no wrong way to do it! Cut out flowers, leaf and stem shapes. Lay them on felt. Add some fancy wool and Angelina fibre. Put fine black net on top. Nothing is glued or stitched at this stage, just pinned to stiff interfacing.

Give it to your sister (that's moi) to quilt it. I used Heart Paisley this time. It's amazing how just a little bit of Angelina fibre comes alive when you quilt it. I also like the way the hairy yarns are captured.

And this is what you end up with. I decided we should decorate the side pockets this time because the bag is going to be made from black denim. It needed more decoration!
Bag front flap and two side pockets.
Happy New Year. That's been a whole year I've been blogging. I'm not great at journals so this is quite an achievement for me. I remember back in the days when I was a software developer and was sent for psychometric testing for a job, they told me that one of my weak points was daily journalling and that I could improve this by keeping a personal diary. I never did and they were right, it was my weakness. I was hopeless at keeping my timesheet! I love that nobody in teaching asks me to account for my time!

Were you in class when the kids were there? - Yes
Did you teach them? - Well, I tried. I taught my little heart out. Don't know if they learnt anything?
Have you marked their assessments? - Yes
Have you written their reports? - Umm, I've written something. It may be a pack of lies.
That's ok, you've done your job and we'll pay you.

So much easier than trying to account for your time in 15 minute slots - or one job I did was down to 6 minute slots! 
Let me see, 10:00 to 10:06, was in the toilet (must take more Metamucil). Who can we charge that to?

Yup, teaching is a lot easier - and the holidays are great! I hope the sun comes out soon and we actually have a summer before going back to school. Meanwhile, I'll keep sewing.

Monday, December 26, 2011

Messenger bag

I made my sister-in-law a messenger bag from this pattern from Quilting Arts. The flap is constructed in the same way I made the last bag; a collage of flowers and leaves on felt, then net placed on top and the whole lot quilted. I used Swirling Petals this time.


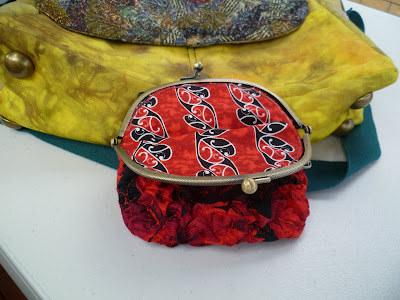
I made her a little purse (coin purse or make-up bag) to go with it. I used the same red flower fabric and this shrinking fabric on the left to make a crinkly fabric. Becky asked me how much it had shrunk. A good question and one I had wondered about too so I took some measurements. It started out as 23cm wide and went down to 17cm. As I'm relating this to her, I was about to work out the ratio... and I realised they are both prime numbers! I have to confess, I got excited about that! Oh dear, maths is turning me nutty. So it can't be simplified and the ratio is 23:17.

This is what the purse looked like finished.


Bag back showing carrying handle and large pocket

Bag front, two small pockets plus side packets and a key swivel

Now I have to make one for my sister. She's here for another couple of weeks so I have a bit more time.

Tuesday, June 7, 2011

My first commission

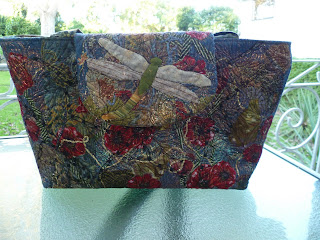
The experiment I posted the other day was a sample for my first commission.  I've been asked to make a bag with a dragonfly on it. It also needed to have a pocket for a Kindle. Other than that, I was free to do what I liked.

I wanted the bag to have plenty of shape to it so I decided to make it with a stiff interfacing.  Then, instead of batting, I decided to quilt on to felt. All the flowers, leaves and yarns are just placed on the felt, not stuck on, then covered with net and heavily quilted. Here is one side of the bag.
And the quilting from the back. This is a design from Leah's 365 free motion quilting designs project, loopy paisley.
I bought a bag making kit from my local quilting shop, Patchwork Passion. The kit had a magnetic clasp, strap buckles, a key thingy and these great feet. Aren't they cute!
I completed this at midnight, the night before our quilt show. I intended to have a flap with the magnetic closer on it but I ran out of time. As you can see, I've added a little strap for the key thingy.  You put your keys on that instead of dropping them in the bottom of your bag and losing them!

You may have noticed that there was no dragonfly on the bag. To tell the truth, I had already decided that if I didn't put a flap on the bag that I would put the dragonfly on the front of the bag - and then I forgot! That's what comes of doing things at the last minute.

I really needed to have a dragonfly on it and also, after making the bag up I decided that it did need the flap on it too. So here it is.

And there is the magnetic closer.
 And the finished bag.

I've got enough felt and interfacing to make one for myself! The basic shape was from this tutorial.

Tuesday, May 10, 2011

My latest experiment


I'm trying out a new technique. This sample is going to be turned into a cover for my sewing machine. It's made from a stiff interfacing, a layer of felt covered in Angelina fibres and a collage of flowers and leaves. Then I've covered the whole thing with a layer of black net and quilted it. Well, I've quilted the bits with no butterfly pins. The rest will have to wait because I have a project that has to be done first.