Sunday, January 19, 2014

Experimenting with Sun Dyes

I had a play date with a couple of friends. We had all bought some Sun Dye paints from Lisa Walton so we had a day of experimenting.

Helen had a little bit of some thicker paint that I used to print leaves by painting onto the leaves and then pressing on to the fabric. Some worked better than others. Sun Dye is too liquid for this technique and perhaps I should have let it all dry before adding the wash over the top!

I loved this effect. This was the wipe up cloth after the one above, plus a little bit more colour to cover and then scattered with Epsom Salts and left in the sun.

This was just a doodle to see how much control I could have over the Sun Dye paint. Not a lot.

This was meant to be a sun print, the reason I bought the Sun Dye paint in the first place! I carefully arranged a load of different leaves on the painted fabric but nothing happened. Helen had the same problem. Then she said, "Do you think that doing it on a glass table is maybe not a good idea?" Duh! Then I had a double duh moment when I realised that I put the painted side down and put the leaves on the back of my fabric! Oh well, I'll just have to have another play.

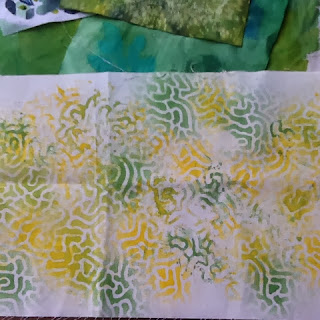
I was very pleased with this sample though. This was another technique that I had been wanting to try, spraying paint through a stencil. The liquid nature of the Sun Dye paint seemed ideal for it. This is one of the Helen's stencils that she bought from Lisa. It's quite small so I had to be careful to only spray the middle to avoid getting a straight line from the edge but as you can see, the pattern seemed to merge into one cohesive whole. I also turned the stencil over and blotted off the excess paint onto the fabric so I've got positive and negative images. I only had one spray bottle and used three different colours but I think this would be easier if you had several bottles and could add more of any colour as you go. You also need to work quickly as the paint drys to a thin plastic film which clogs the nozzle. A great effect and well work the effort!

So I had another play. It was a lovely still day yesterday but I was too busy. Today was a little bit windy but very sunny. This time I lined the table with cardboard and a sheet of plastic and although I was worried that the fold in the cardboard might show through, the results were good.
 I painted this length in about three sections to try to get the leaves on to wet paint. Some of them stuck to the paint but I put pebbles on top just to be sure they didn't fly away.
 I scattered these little skinny leaves over when I had finished and the fabric felt dry already, I didn't think it would work but they look great. They give a real feeling of depth to the print, like little fishes swimming under the lily pads!


Wednesday, January 15, 2014

Thread bowl

Remember this?

It became a little bowl.

Made by placing several strands of embroidery cotton floss between two layers of water soluable stabiliser and free motion stitching over the whole thing. The top photo shows how little stitching I did to get this quite sturdy bowl. I think a little less embroidery floss and more stitching would be better. Then I took a polystyrene ball, chopped the bottom off it and covered it in plastic wrap. Washed out the stabiliser and shaped around the ball with a little bit of Mod Podge and left to dry.


It looks like the wigs my Mum made for a fancy dress party my brothers went to in the mid '60s. Guess who they went as? Hint, it was my two brothers and two friends. :)

I have ideas for this technique which I hope to fulfill in the holidays. Only two weeks to go...

Tuesday, January 7, 2014

Tablecloth finally finished!

As I write this, my tablecloth is in the washing machine so technically, it isn't finished yet. This is an anxious time. Now I'm going to find out how colourfast my crayons are!
This is before the wash.
And after the wash. I swear that's a different photo. I'm really pleased with the results. So the trick is leave your crayons to cure for a year!

Well, I wrote that above about 6 months ago. Since then I've put on the binding but never finished it because my table hasn't been clear of Becky's stuff! But look at this lovely neat and tidy corner now, complete with finished tablecloth! Just as well my photos aren't 360 degrees because some of the "stuff" is behind me. (Becky, I'm down to one box and the the tray - yay!) 


 I used the same binding technique I did on the clown. You can see how to do it here. I like the little bit of blue batik showing on this binding.
And here is how it looks on the back. The stitch-in-the-ditch on the binding just shows as a straight line about quarter of an inch from the binding, depending on the width of the binding and how good your quarter inch seam is when you sew the binding on. This is my best corner that I'm showing you. In other parts my quarter inch seam was not so good! Still, it's quick and I think gives a good finish.

My original post about this quilt is here. I'm embarrassed to see that that post was 18 months ago! Maybe this is the year that I actually finish things!

Saturday, January 4, 2014

Lion

I've been over to Sydney to see my daughter and left the lion with her. Yes, she's 27 and no, she doesn't have kids but she wanted this lion so I made it for her! He is very cute!
His mane is six different yarns, predominately a variegated wool so there is lots of colour. I love the look but it took ages, sewing and tying each piece. I'm very pleased with the outcome though. Becky said that lions have tufts on the end of their tails so I added a tuft to his tail.
So he needs a name. Any ideas?