Saturday, June 25, 2011
Quilting a community quilt
This quilt is going to be given to a charity through the guild. I wanted to practise my quilting now that I have a Supreme Slider and I don't often make bed quilts so I volunteered to quilt this quilt. It's a good 'boy' quilt so I don't want to do anything feminine on it. Ferns seemed like a good idea. Maybe I'll regret that after I've done a few! I'm going to put ferns on all the dark blue bits so that the stars stand out but I'm going to have to quilt the stars too. Any ideas? All I can think of is a flower in the middle but that's too girly.
Thursday, June 23, 2011
Untied knot
I've started yet another project! I found I couldn't stop thinking about it so I had to get it out of my system. My couch is still waiting for its other cushion covers. Boring!!! This was much more interesting.
This is from the doodle I posted a few weeks ago. I'm using my baste and topstitch method but all the 'string' of the knot is going to be on top so I've basted all the red background first. Here's a close-up of the first bit of string. All will become clear when I get on a bit further!
In other quilty news, I am now the education officer for our quilt guild, Counties Manukau Quilters Guild, so I'll be on the lookout for new and interesting ideas - and tutors.
My sister has just been over visiting. She came via Florida and bought me a Kindle for my birthday and two rolls of freezer paper. I love my Kindle (read one book already) but I'm really excited about the freezer paper. It is possible to buy freezer paper here in New Zealand but only by the metre from quilt shops.But I now have two rolls! All mine! Just think what I can make out of that!!
Tuesday, June 7, 2011
My first commission
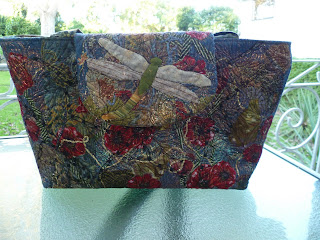
The experiment I posted the other day was a sample for my first commission. I've been asked to make a bag with a dragonfly on it. It also needed to have a pocket for a Kindle. Other than that, I was free to do what I liked.
I wanted the bag to have plenty of shape to it so I decided to make it with a stiff interfacing. Then, instead of batting, I decided to quilt on to felt. All the flowers, leaves and yarns are just placed on the felt, not stuck on, then covered with net and heavily quilted. Here is one side of the bag.
I completed this at midnight, the night before our quilt show. I intended to have a flap with the magnetic closer on it but I ran out of time. As you can see, I've added a little strap for the key thingy. You put your keys on that instead of dropping them in the bottom of your bag and losing them!
You may have noticed that there was no dragonfly on the bag. To tell the truth, I had already decided that if I didn't put a flap on the bag that I would put the dragonfly on the front of the bag - and then I forgot! That's what comes of doing things at the last minute.
I really needed to have a dragonfly on it and also, after making the bag up I decided that it did need the flap on it too. So here it is.
I wanted the bag to have plenty of shape to it so I decided to make it with a stiff interfacing. Then, instead of batting, I decided to quilt on to felt. All the flowers, leaves and yarns are just placed on the felt, not stuck on, then covered with net and heavily quilted. Here is one side of the bag.
And the quilting from the back. This is a design from Leah's 365 free motion quilting designs project, loopy paisley.
I bought a bag making kit from my local quilting shop, Patchwork Passion. The kit had a magnetic clasp, strap buckles, a key thingy and these great feet. Aren't they cute!I completed this at midnight, the night before our quilt show. I intended to have a flap with the magnetic closer on it but I ran out of time. As you can see, I've added a little strap for the key thingy. You put your keys on that instead of dropping them in the bottom of your bag and losing them!
You may have noticed that there was no dragonfly on the bag. To tell the truth, I had already decided that if I didn't put a flap on the bag that I would put the dragonfly on the front of the bag - and then I forgot! That's what comes of doing things at the last minute.
I really needed to have a dragonfly on it and also, after making the bag up I decided that it did need the flap on it too. So here it is.
And there is the magnetic closer.
And the finished bag.
I've got enough felt and interfacing to make one for myself! The basic shape was from this tutorial.
Friday, June 3, 2011
Transformation challenge part 2
My second experiment:
I tried a different fabric. That white fabric feels like a poly/cotton but it isn't. A softer cotton is easier to quilt.
The hearts were an experiment with the bobbin and feed dogs. The first group is feed dogs up and bobbin thread just through the tension clip in the bobbin case. The second group is feed dogs down. Then for the next group I threaded the bobbin thread through the eye in the bobbin case as well as the tension thingy. Bernina machines (and some others) have an eye on the bobbin case. The first six hearts are done with the feed dogs down and then I put them back up. I think the quilting is smoother on the third group.
This is another idea that I was exploring. It's an untied celtic knot!
And this is just a doodle - but it was fun to do it.
Thursday, June 2, 2011
Transformation contest - part 1
I've had a really boring week making new cushions for my couch. I made the first one too tight and had to remake it. So now I don't have enough fabric. On top of that, when I worked out how much fabric I needed, I didn't take the pattern of the fabric into account and it is directional (nap, as seamstresses would say) and so I've had to cut out the cushion covers with a lot of wastage. I hate taking up hems, mending zips and making functional items. I would much rather be sewing little scraps of fabric together!
So, after finishing just one cushion, here's my reward. I've been working on an entry for a contest.
The theme is 'Transformation'. Of course, being a maths teacher, that means geometry to me. Reflection, rotation and translation. When I teach transformations, I always do a lesson where I get the students to draw kowhaiwhai designs and identify the transformations that they have used, perhaps last period on Friday or some time when I don't want to think. They always enjoy it and I get a break! I do love the designs though. In fact, kowhaiwhai designs have been my inspiration for a previous quilt. See this post on the design of Koru Gecko.
The size of the contest quilt is only 9 by 12 inches. I thought that the small format made it difficult to make a design out of fabric, even using the method I've used for my recent quilts. The focus has to be on the quilting so I decided that quilting would be the only colour in this quilt. I needed to see how quilting would fit into small spaces so this sketch is full size.
The quilting designs look cool in pencil. Can I do the same thing in thread?
Ok, so some of it needs a bit of work but I think the idea is coming together.
I was testing a couple of things in this sample. Firstly, how densely does it have to be quilted for the colour to look good. Answer, at least a bit more tightly than the white of the design. Looking at the top black bit, there is one section where I made the strands a little further apart, just to try to fill the space a bit quicker. I think there is too much white showing and it is competing with the design. The quilting has to be as dense as the pebbles otherwise the white design doesn't pop out. The red coffee beans work because although the coffee beans are big, the white space is broken up with the wiggly line through the coffee bean.
The second thing I wanted to test was a good way to stay in the lines. Now, it didn't help that I just drew this design freehand with an erasable marker that is just about dead! My first idea was to quilt the lines with a wash-away thread and then quilt with colour up to the lines. I did the red border first. As you can see, I went over the lines and my design was eaten up by the quilting. Then I tried just marking the line with pen and quilting up to it. A felt pen mark is about 2mm thick and not precise enough for such a small scale quilt. Also, sometimes I forgot to fill in the line so my white design is bleeding out into the quilted space. Then I did the black border and decide to simplify the design at the same time. A bit better result. The last part was the main design in black. This time I went around my felt pen mark carefully with one line of black thread first. I think that's the way to go. I found it easier to keep the quilting in the space.
So now I need to draw my design properly and think about how to get it on to the fabric. The other problem I foresee is that the finished piece has to be exactly 9"x12" and I have no idea how much the quilting is going to draw it in. I should have measured my sample before I started. Look at all the lovely maths that would involve!
So, after finishing just one cushion, here's my reward. I've been working on an entry for a contest.
The theme is 'Transformation'. Of course, being a maths teacher, that means geometry to me. Reflection, rotation and translation. When I teach transformations, I always do a lesson where I get the students to draw kowhaiwhai designs and identify the transformations that they have used, perhaps last period on Friday or some time when I don't want to think. They always enjoy it and I get a break! I do love the designs though. In fact, kowhaiwhai designs have been my inspiration for a previous quilt. See this post on the design of Koru Gecko.
Scribbles in my sketchbook |
The size of the contest quilt is only 9 by 12 inches. I thought that the small format made it difficult to make a design out of fabric, even using the method I've used for my recent quilts. The focus has to be on the quilting so I decided that quilting would be the only colour in this quilt. I needed to see how quilting would fit into small spaces so this sketch is full size.
The quilting designs look cool in pencil. Can I do the same thing in thread?
Ok, so some of it needs a bit of work but I think the idea is coming together.
I was testing a couple of things in this sample. Firstly, how densely does it have to be quilted for the colour to look good. Answer, at least a bit more tightly than the white of the design. Looking at the top black bit, there is one section where I made the strands a little further apart, just to try to fill the space a bit quicker. I think there is too much white showing and it is competing with the design. The quilting has to be as dense as the pebbles otherwise the white design doesn't pop out. The red coffee beans work because although the coffee beans are big, the white space is broken up with the wiggly line through the coffee bean.
The second thing I wanted to test was a good way to stay in the lines. Now, it didn't help that I just drew this design freehand with an erasable marker that is just about dead! My first idea was to quilt the lines with a wash-away thread and then quilt with colour up to the lines. I did the red border first. As you can see, I went over the lines and my design was eaten up by the quilting. Then I tried just marking the line with pen and quilting up to it. A felt pen mark is about 2mm thick and not precise enough for such a small scale quilt. Also, sometimes I forgot to fill in the line so my white design is bleeding out into the quilted space. Then I did the black border and decide to simplify the design at the same time. A bit better result. The last part was the main design in black. This time I went around my felt pen mark carefully with one line of black thread first. I think that's the way to go. I found it easier to keep the quilting in the space.
So now I need to draw my design properly and think about how to get it on to the fabric. The other problem I foresee is that the finished piece has to be exactly 9"x12" and I have no idea how much the quilting is going to draw it in. I should have measured my sample before I started. Look at all the lovely maths that would involve!
Subscribe to:
Posts (Atom)