Monday, December 26, 2011

Kunekune pig

LuAnn Kessi's blog is one of my favourite reads. Her quilt of her dog features on the Quilting Arts calendar. He's Mr February. LuAnn uses some lovely looking pencils and crayons to colour in black and white prints she prints on to fabric. I didn't get a set of Derwent Inktense blocks from Santa (he mustn't have got my letter) so I thought I would try it with fabric paint. So we went to the zoo, took lots of photos and then I printed them on to very expensive paper backed fabric. (I'm going to try out a cheaper option next). Then I thought, why not share the love. LuAnn does this as a workshop for cancer patients. They all seem to really enjoy it so I thought I would do it with my family on Christmas day. Beats watching the telly any day!

This is what my nephew produced. He called her Betsy.


And this was the process.
Kunekune pig at Auckland Zoo

Manipulated in FastStone and printed on fabric

Paint-by-numbers (without the numbers)
Details added with free motion quilting in black
I have some more that haven't been turned into quilts yet, including the most adorable meercat! Watch this space!

Messenger bag

I made my sister-in-law a messenger bag from this pattern from Quilting Arts. The flap is constructed in the same way I made the last bag; a collage of flowers and leaves on felt, then net placed on top and the whole lot quilted. I used Swirling Petals this time.


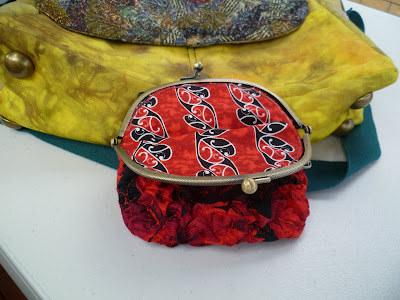
I made her a little purse (coin purse or make-up bag) to go with it. I used the same red flower fabric and this shrinking fabric on the left to make a crinkly fabric. Becky asked me how much it had shrunk. A good question and one I had wondered about too so I took some measurements. It started out as 23cm wide and went down to 17cm. As I'm relating this to her, I was about to work out the ratio... and I realised they are both prime numbers! I have to confess, I got excited about that! Oh dear, maths is turning me nutty. So it can't be simplified and the ratio is 23:17.

This is what the purse looked like finished.


Bag back showing carrying handle and large pocket

Bag front, two small pockets plus side packets and a key swivel

Now I have to make one for my sister. She's here for another couple of weeks so I have a bit more time.

Thursday, December 22, 2011

Hand-dyed fabric

I've been having fun! I've been dying (pun intended) to do this for ages! You just mix up dye and pour it down the fabric. I don't have a place I can do messy things so this is my carport.

And my work bench!

The dye has to cure for at least 4 hours and not dry out in that time. I didn't want to ruin the streaky effect and hadn't thought about how to cure it until after I had dyed the fabric. Fortunately I bought a plastic drop cloth on a roll and had the brilliant idea (no modesty here!) of putting out a length of drop cloth and laying the fabric carefully on top, then covering with the drop cloth. I left the fabric until it stopped dripping so that the dye stayed put. Hopefully it will still look good tomorrow morning when I wash it out.

Tuesday, December 20, 2011

Journal cover

Our band leader, Camille, is going home to Trinidad for three and a half months. We wanted to get her a present to thank her for all the wonderful work she does for the band. We thought she may like a journal for her poetry. I remembered seeing an idea for a cover (link here) and suggested that I made her a covered book. She's always on at me to make her a quilt!

Camille is from Trinidad and her husband is Samoan so I thought and island inspired cover would be good. My first idea was to buy a fabric with hibiscus and then embellish it. Couldn't find any hibiscus! So I painted a beach scene instead.  I thin the fabric paint with Aloe Vera gel. It's difficult to find the clear stuff but this green one works fine and doesn't tint the paint. It smells lovely too. Bonus when ironing!

I densely quilted the cover but not the flaps.

I quilted a steelpan for Camille and Samoan tapa cloth for George.

The inside flaps. The thing I liked best about this design is that the cover is removable.

I wish I had a video of this moment. She squealed! George was engrossed in his pen. He has to share the journal but we bought them a pen each.

We wish them both a relaxing time in Trinidad.


Thank you to Ms Lottie for a great project.

Wednesday, November 23, 2011

Becky and Josh got married

Eggs beni for breakfast

Jessie, Issac and Josh with Melanie - waiting on Eggs Beni

Mel even went to pick up the flowers

She looked after them well

Jessie doing Becky's hair - with Mel's help

The lovely couple

Oh, look who is with them

Kiwi bride - no shoes

We had to a photo of the shoes. Josh grovelling at Becky's feet.

Aren't they great!

I made a Bridesmaid!

Today my younger daughter, Becky, is getting married. Her sister, Mel, is living in Doha, Qatar and can't make it here so she tasked me with making her so that she could be Becky's bridesmaid. Here we are on Sunday when I made her.

I thought a little tutorial would be a good idea, just in case you ever need to make a bridesmaid. Here is the requirements list.

Foamboard
Cutting mat
Craft knife
Spray adhesive
Nail file to sand the edges
An email from mad daughter with a photo for the front of the bridesmaid and some instructions for the back
Car keys to go to Warehouse Stationery and print A3 colour copies
Energy drink - just because I'm mother-of-the-bride and I've still to finish altering Becky's dress, mark Year 9 exams and write 80 junior reports!!

Spray the back of the photo with adhesive and stick it to the foamboard. Cut out on the line. Spray the back of the foamboard and position carefully on the back of the message. I did this by taping the instructions to a window so that I could see the outline. With the photo side uppermost, trim the back paper to the shape of the foamboard. Buff the edges with the nail file to remove the black cutting line and any bobbily bits of foamboard.

Ta da! Here is the back. More wedding photos to follow...

Sunday, November 6, 2011

Calico Christmas Quilt Show

Finally, here is 'Celebrate Onehunga'. Not the sharpest picture I've ever taken with my little camera but you get the idea. The original quilt was going to be nine panels. I will still make it - and the other two I have planned. I even have an exhibition space in mind and the word of a councillor that she can make it happen!! I warned her that it may take me a couple of years to make them.

There are some stunning quilts in the show. The highlight of the show for me was meeting the Thimblelady, Liuxin, from Sydney. She is one of the judges and does the most beautiful applique. She is also the inventor of a special thimble, hence the name. I have no desire to perfect my hand applique or hand quilting but I can admire her work. She had one small quilt on show of a tree with tiny leaves. Each leaf was about the size of a nail clipping! How on earth does she manage that?? I suppose you have to go to her classes or read her book to find out. She was demonstrating her latest tool, a stitch regulator for whipstitch piecing. I wouldn't say I have any interest in that type of patchwork either but her love for what she does is so infectious that I'm considering taking it up!

Update with a slightly better photo.


Other posts on this quilt
pukeko take 2
second cabbage tree
Onehunga Bay reserve
mosaic table and chair
first cabbage tree
Inspiration and start of One Tree Hill

Tuesday, November 1, 2011

Caribbeanz Southern Stars Steelband

http://www.smartnetwork.co.nz/feature/beats-our-backyard-trinidad

Our band features in this documentary. I'm the one in the purple t-shirt under our flowery band shirt. I didn't realise how grey my hair was! I used to dye the grey streak blond but that's all natural now!! Anyway, that's not important. Check out our music and the interview with my friend, our band leader, Camille.

Sorry, no quilts today. :P Here's Camille telling a joke at Larry's expense instead.


Sunday, October 30, 2011

Blogger's Quilt Festival

Amy'sCreativeSide
It's that time of year again - time to see lots of lovely quilts over at Amy's. Click on the button on the left to see the show.


Highland Dancing Fairy

I made this quilt for my niece just because I had given her brother a quilt. My nephew is mad keen on the Beatles and I found some Beatles fabric so I had to buy it. Then you can't give one a quilt and not give the sibling a quilt too. This was supposed to be a simple wallhanging. I didn't intend to make this as complicated as I did but as the idea grew, so did my excitement level. Funnily enough, this quilt is the one that more people find by searching the web. Who knew that highland dancing fairies were so popular! 

This is my niece with her quilt and showing her moves. 

 Our family is originally from Scotland. I moved to New Zealand 17 years ago and my brother moved to Australia more recently (I can't remember when but when the kids were small). My brother and his son are in the local pipe band and my niece has given up ballet and taken up Highland dancing. I guess they miss Scotland more than I do! I didn't even put tartan in this quilt! Mind you, I thought that a fairy would wear a tutu and not a kilt so I made her a tutu. It even sticks out from the wallhanging.

 She has a real pom-pom on her tam 'o shanter.

and gossamer wings.


Monday, October 24, 2011

School holidays

School holidays are over. What have I achieved? I cleaned my house, got sick (nasty virussy thing), made this cot quilt.

I also managed to go to a quilting class with Rosemary Rush. I had to leave early and I didn't really take advantage of the learning opportunities (that's teacher-speak for 'is lazy and didn't work') but it turned out it was a 5 day virussy thing and I thought I was better but I wasn't. I hope I wasn't contagious.

Angie Simmons made a video montage of her photos from Rosemary's class. You can see it here.

I tried out a quilting pattern of Rosemary's on the cot quilt. I hope you can see it. It's a spiral with a ring of spiky triangles and it fills the space quite quickly. There are a few leaves and simple teardrop flowers in there too. This quilt only took an hour to quilt, and that includes having to refill the bobbin. I'm hoping this will inspire a few more people in our guild to give free motion quilting a go and make some cot quilts for the neonatal unit.
Just in case you were worrying, I'm going to give this a good wash before donating it to a sick baby!

Saturday, October 1, 2011

I made the hand-in time!

Last minute - as usual! I was manning one of the hand-in desks and sewing a velcro strip on the back of my quilt at the same time. I ended up being on the busiest desk too. I can tell you that in the amateur wallhangings section alone in Calico Christmas this year there are 60 quilts! Fortunately some of the other ladies wrote some of the receipts for me, one lady even did a bit of my sewing when I was inundated with quilts. What a lovely bunch of people!

Anyway, with all the last minute work, I never took a photo of the finished quilt! Sorry to those of you who were eagerly awaiting the unveiling (and thank you for the lovely comments). I didn't do this on purpose - honest! I can show you a couple of pieces joined together. The rest will have to wait until I can photograph the quilt in the show.
 

Details of the the quilt show here.

Other news, Leah has posted the winners of the Transformation Challenge. My little quilt wasn't a winner but I can see why. Mine was very different to the other quilts and would have stuck out like a sore thumb. I didn't think of that when I designed it. Never mind, it means I get it back - and one of Leah's books too. I'm happy about that.

Thursday, September 29, 2011

Celebrate Onehunga - Pukeko take 2

So, I'm running out of time to get this finished! I changed my plan and had to redo this panel so that it fits. I decided to make it slightly less pink and also you can see a bit of Cabbage tree has crept into this block too!

Melanie asked me what I meant by "blocking". Blocking is stretching out a piece of quilting or embroidery to make it lie flat. I dampen my wallhangings by pressing them with a very damp tea towel. I don't press hard with the iron, just enough to get the steam into the quilt. Then I pin the quilt to a bit of ceiling board with very sharp pins, smoothing the quilt as I go, and leave it to dry.  That makes them nice and flat.

Here is the detail on the bird.

Tuesday, September 20, 2011

Celebrate Onehunga - second Cabbage tree

A busy weekend in Hastings playing steelpan so no sewing done. I have managed to finish panel number 5 today. This is a continuation of the Cabbage tree panel, one of the first panels I made. I love the way that some Cabbage trees look like they are straight out of a Dr Seuss book.

I keep trying to do less intense quilting so that this goes a bit faster. As you can see, I'm failing!

Monday, September 12, 2011

Celebrate Onehunga - Onehunga Bay Reserve

Panel number 4. This is Onehunga Bay Reserve, a great place to go for a walk with the dog. This is an off-leash park, which may explain why I've never seen a Pukeko there. So a bit of artistic license here!
The colour is slightly less magenta than the picture above but not as orange as this one below.

Thursday, September 8, 2011

Celebrate Onehunga - mosaic table and chair

I've been having fun making new quilting patterns. Probably not new to the world but new to me!


I love the back!


Three panels done! Only six more to go...