Pages

Sunday, May 19, 2013

Melted wax crayon art

Our arty farty group experimented with melting wax crayons.

I tried a fairly conventional one to start with. I glued crayons to each end and then melted them, tipping it to one side then the other. What I was aiming for was a sunset. What I got was a mess! I had also added dribbles of hot glue and I didn't think about the effect that would have. It meant that the wax was restricted to the channels formed by the glue. I also didn't think what would happen when the orange and turquoise wax mixed. It made muddy brown. I fixed it by using a small iron to add more turquoise to make a sea.

The spots of orange on the sea that look like goldfish are meant to be the sun shimmering on the sea! I've also added surf using acrylic paint and a silhouette of a yacht and palm tree using a black sharpie. This is about 8" by 16".


This photo with the crayons cropped out looks not bad!


I like this one on the black canvas better. Again, I've used white acrylic to add detail. 4" x 12"


And finally, I made this little 4" x 4" painting just by holding the crayon in front of the canvas to make the tree trunk. The leaves and bird were made by heating the crayon and dabbing it on. The apples didn't really work. I heated the end and tried stamping a circle.

Saturday, May 18, 2013

Bloggers' Quilt Festival

This is my entry for the Bloggers' Quilt Festival run by Amy of Amy's Creative Side. I'm entering this quilt into the wallhanging category. 

I'm in good company in the wallhanging category. Rhianon from Nifty Stitcher got in early. Rhianon does the most amazing work! It was less than 2 years ago she was complimenting me on my quilting and saying that she was starting free-motion quilting. Now it's me trying to emulate her quilting. I wanted the nice buttery quality that Rhianon manages to get in her feathers. Getting there.


I've also quilted a motto on this quilt. Maybe I should tell the story behind it.

Our local quilt guild put out a challenge to make a quilt representing your favourite charity. I didn't need to think twice. I am so impressed with the work that the hospice do. My Dad died of cancer almost 5 years ago. He never stayed at the hospice but the nurses came out to him. So I didn't actually see the inside of the hospice until after he died when we were invited to be part of a fund-raising project at Mercy Hospice in Auckland. Mum and I were given a tour. I always thought that hospices were places where people died. Their motto is 'Living every moment' and that's what we found out on our tour. It's all about living, even those last moments. We saw their very clever bath where patients can be helped into with the greatest of ease and then sat up with a beautiful view out the window to the gardens. At hospice, having a bath isn't about bathing but an opportunity to enjoy a moment of life. We were also told about the amazing work that volunteers do, coming in for beauty sessions etc.

The logo for the hospice group is the yellow kowhai flower, a native tree in New Zealand. I've made it by drawing up a large paper foundation pattern on freezer paper. The middle section is just over 18", the width of freezer paper, then I added the yellow and green borders. All the green fabrics are from a batik pack I bought at fabric-a-brac, a fundraising event run by the hospice every year. I'm going to give the quilt to the hospice. It's funny to think they're going to get their fabric back!

I've very pleased with this quilt. I love the batiks. I couldn't find a variety of yellow batiks but the prints and yellow solid go well with the batiks. The paper foundation method is easy and very versatile. This is definitely a technique I will use again. And finally I like the way the feathers all fit into each other. I've made this so it can be used as a lap quilt so I haven't done any dense quilting with stippling between the feathers so they had to cover the entire quilt. That turned out to be easier than I expected. I'm not sure what the hospice will do with the quilt, sell it, use it or display it. I don't mind. I made it for them as a thank you for the care they showed to my Dad.

Monday, May 13, 2013

Our quilt show is over for another 2 years

Well, between visitors from Scotland (via Australia), the first week of term and the quilt show this weekend, it's been a busy old time!

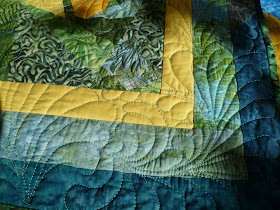
I did finish the challenge quilt, 5 hours before the deadline I was working to but unfortunately, more than 24 hours after the deadline that I was supposed to be working to. I'll do a full photo of it at the end of the week for Amy's blogger's quilt festival. Here's a bit of the quilting in the meantime.
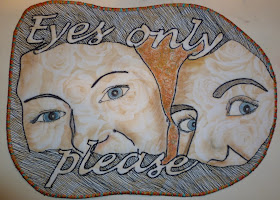
My 'Eyes only please' was one of three winners for the 'Don't touch the quilts' signs.
We ran a demonstration corner at the show. We were machine quilting, piecing, hand quilting and starting a new mystery quilt using needleturn applique like the clown quilt. There was some good interest on Saturday with great conversations with some ladies. Sunday was a little bit more quiet but still, some ventured on to the stage to see what we were up to. All in all, I think it was very successful and I'm game to do it again for the next show.

Sunday, May 5, 2013

Oscar the elephant

I was very excited to receive my copy of Abby Glassenberg's book 'Stuffed Animals'. Even though I'm on a tight deadline to get things finished for the show, I couldn't resist making an elephant. Meet Oscar.


He's made out of brown polar fleece with batik ears.

I love Abby's designs. He stands up very nicely due to clever design. And can you see his mouth? It's details like this that make all the difference.

His toenails and tail are grey felt, just because that was what I had and I was impatient to start. I had to go shopping (imagine that!) for his eyes so I tried out some different colours. Firstly, I tried the same colours as in the book, grey eyelid and orange/brown iris. Not right! So I tried the dark brown iris. Better. I also bought some green to match his ears but that didn't look right either. Then I tried a dark brown eyelid. Bingo!


This is a lovely book. So many photographs! You can almost follow the instructions by just looking at the photos. Almost, but not quite. I'm not good at slowing down and reading instructions but I was a bit confused about what to do with the mouth. I had to resort to reading and I have to say, the instructions were very clear. I should have read the instructions for inserting the ears too. I cut the slit too big. My mistake!

I love all the notes on pattern design and ideas for making the softie your own. There is so much information in the lessons and extra notes on adapting the patterns. I've got some great ideas for my next elephant.

My challenge quilt is almost done. It washed and blocked and beautifully flat - difficult considering all the bias edges when you paper foundation piece. I just have to add the binding. Also the clown is just about finished. It's been a productive school holidays. All good things come to an end though and it's back to school tomorrow.